Introduction
The whole-house systems approach to home improvement looks at the entire house as an energy system with interdependent parts. Like a human body, when one part functions poorly it affects the performance of the entire system. For instance, the benefits of an energy-efficient heating, ventilating, and air conditioning system are lessened when a duct system leaks, windows don’t close tightly, attic insulation is insufficient, and humid summer breezes are drifting in under the door.
The systems approach recognizes the interaction of windows, attics, foundations, mechanical equipment, and all other building components and assemblies within the home. Changes in one or a few of these building components can cause changes in how other components perform. If you recognize and take advantage of this fact, and apply appropriate advances in technology to the building components, you can reduce your energy costs while improving your comfort. From a builder’s or seller’s perspective, an energy-efficient home is likely to be more marketable—especially if you can show the prospective buyers your low energy bills.
One study found ENERGY STAR® Certified New Homes in the Raleigh/Durham area of North Carolina sold for an average price premium of $5,566 (or $2.99 per square foot) more, 89 days faster, and with final sale vs. original listing price ratios 0.48 percent greater than their code-built comparables. [1] Another study in Fort Collins, Colorado, found this ENERGY STAR® Certified New Homes price premium to be as high as $8.66 more per square foot. [2] However, in order for these benefits to be fully realized, residential real estate markets will need to bridge the persistent “disconnects” between high performance home program implementers, real estate professionals, property appraisers, and households both buying and selling homes. [3]
A Systems Approach: Why It Is Important
Energy efficiency not only saves you money, it also saves natural resources. Take a look at your electric bill (i.e., just the electricity part, not the charges for water, gas, solid waste disposal, taxes, etc.). How many kilowatt-hours (kWh) of electricity did you use last month? Generating that electricity typically uses nonrenewable resources like coal, natural gas, and oil. So although it’s your home, it’s everyone’s environment.
We all play a role in protecting the water, air, and soil that supply food, shelter, mobility, and community for human and non-human species alike. Energy efficiency helps reduce the negative effects of burning fossil fuels by providing the same quality of services with reduced energy inputs and greenhouse gas (GHG) emissions. One study suggests GHG emissions associated with home energy use can be cut by 70% with current technologies. [4]
Even water consumption and water quality are related to energy consumption, as it takes water to process fuels and generate electricity, and it takes energy to withdraw, distribute, and treat water (Figure 1). [5] [6] [7] [8] New materials and technologies in home construction and remodeling mean you can live more comfortably and help the environment by reducing pollution and conserving natural resources.
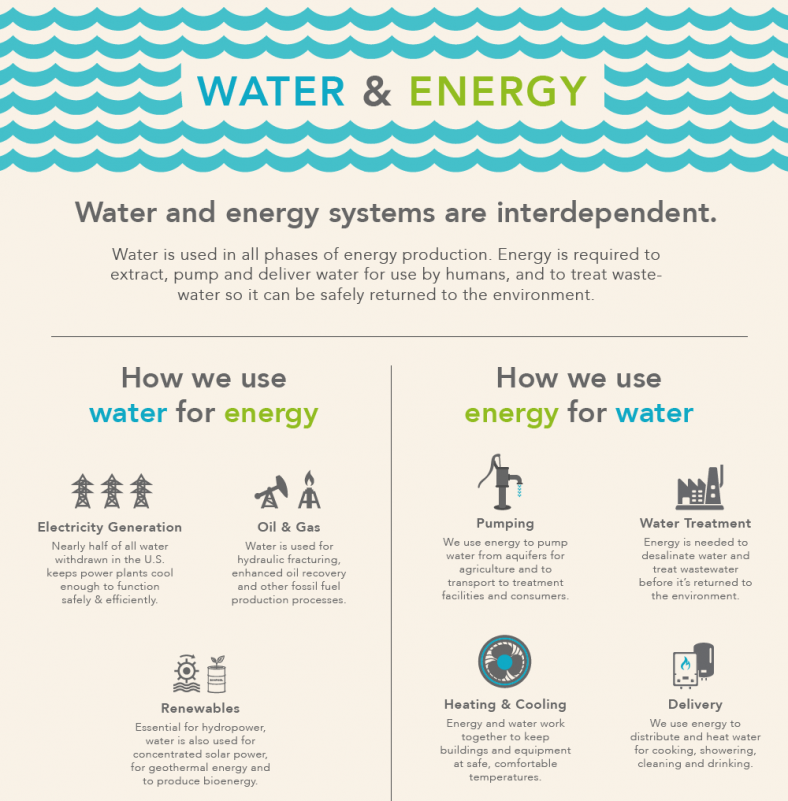
Figure 1. Water and energy are interdependent and all life on Earth relies on a steady, clean, accessible flow of these core resources (Click on the Image to Open the Full Infographic). Credit: US Department of Energy (DOE).
A Systems Approach: Where to Start
Taking a step-wise approach to home renovation or equipment replacement will ensure that you get the most bang for your buck when it comes to thermal comfort and energy efficiency. The major steps are outlined below and described in more detail in the sections that follow.
- Analyze your baseline and evaluate your lifestyle
- Tighten your air barrier
- Thicken your thermal barrier
- Estimate your space conditioning needs and upgrade accordingly
- Estimate your water heating needs and upgrade accordingly
- Replace major appliances and fixtures with ENERGY STAR® certified models when they fail or have surpassed their useful lifespan
Step 1. Audit, Act, and Adapt
Begin by looking at yourself. Even with minimal monetary investment, mindfulness about the how and the why we do what we do at home can go a long way toward reducing our energy and carbon footprint…as well as reducing the anxieties of a stressful life. After all, a house is not a home without the busy, buzzing of its human occupants and a systems approach to whole-house improvements begins within the personal temples of our own bodies and minds. You are the brains of the home, so be energy wise. Remember, life is an experiment from which to live, learn, and repeat. So don’t judge yourself negatively and enjoy the ride!
“It can be difficult to define Wisdom, but people generally recognize it when they encounter it. Psychologists pretty much agree it involves an integration of knowledge, experience, and deep understanding that incorporates tolerance for the uncertainties of life as well as its ups and downs. There’s an awareness of how things play out over time, and it confers a sense of balance.
Wise people generally share an optimism that life’s problems can be solved and experience a certain amount of calm in facing difficult decisions. Intelligence—if only anyone could figure out exactly what it is—may be necessary for wisdom, but it definitely isn’t sufficient; an ability to see the big picture, a sense of proportion, and considerable introspection also contribute to its development.”
–Psychology Today
No Cost Actions: Establish a Baseline and Set Goals to Achieve
The “Choices to Save Resources” section of the My Florida Home Energy website offers several helpful fact sheets for leading a more resourceful and adaptive lifestyle. For the strongest foundation, start with our Interactive Tour and Self Audit to get a quick baseline of your home performance, followed by learning about goals to set through Being an Energy Giver and Home Energy: Basics.
No Cost Actions: Keep the Energy Vampires Off Your Party Guest List
While the “Monster Mash” may be a fun dance, nobody likes a vampire! Energy vampires are the consumer electronics, appliances, and other household plug loads that use small amounts of electrical standby power (called phantom loads), even when they appear to be in their “off” setting. While some devices like a cable set top box may offer worthwhile benefits from standby power (e.g., remote control connectivity and automated wake settings for recording pre-programmed shows), many other devices draw power unnecessarily. The US Department of Energy (DOE) Lawrence Berkeley National Laboratory (LBNL) has created a web site with extensive information about Standby Power / Phantom Loads. No need for garlic and wooden stakes, energy vampires vanish with smart humans and smart power strips!
A fun video on Vampire Energy from the folks at Good: A Magazine for the Global Citizen.
Low Cost Actions: Switch the Lights and Find the Wind Beneath the Fans
By now it probably seems cliché, but small actions can have large impacts. The US Energy Information Agency (EIA) estimated that residential and commercial sector lighting accounted for 412 billion kilowatt hours (kWh), about 11 percent of total US electricity consumption. What a bright idea!…something as simple as unscrewing some old light bulbs (officially referred to in the lighting industry as lamps) and replacing them with advanced compact fluorescent lamps (CFLs) or light emitting diodes (LEDs) can reduce the energy needed to light our buildings by 70 to 90 percent.
While it is a common misconception that ceiling fans reduce room temperatures, the evapotranspiration effects of moving air over human skin can help occupants to feel cooler even at higher temperatures. When properly located and used, ceiling fans can save from 4 to 8 percent on air conditioning costs. Just like the no cost actions, these low cost actions only save energy and money in relation to our behaviors. So be sure to flip the switches off when you leave the room or you’ll be paying to light empty spaces and to move air across unused furniture.
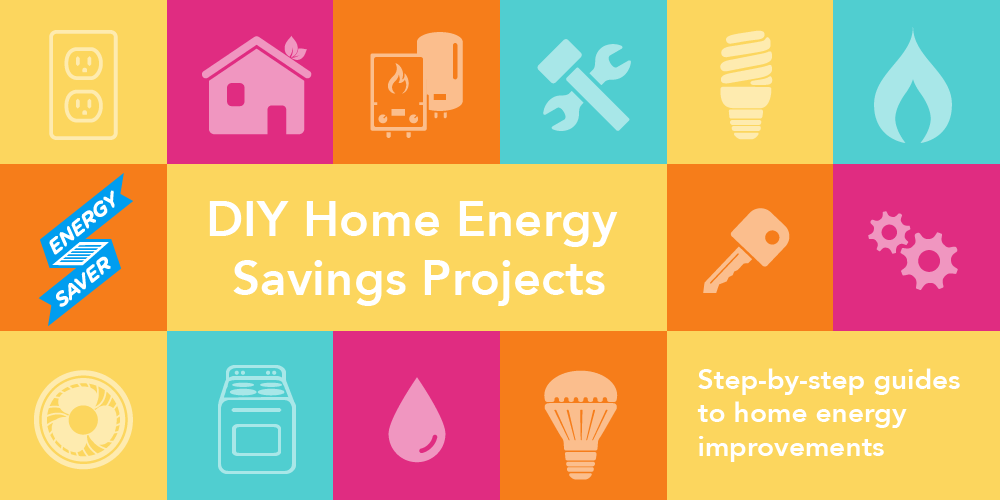
Figure 2. Energy Saver: Do-It-Yourself (DIY) Energy Savings Projects. Credit: US DOE – EERE.
Low Cost Actions: Landscape for Energy Efficiency
Even simple landscaping changes can help you to save energy by strategically using vegetation to shade a home in the summer and allow the warming sun to shine through in the winter. Nursery plants from larger sized container may be more mature at the point of purchase and presumably offer faster building shading. Yet, smaller sized container plants, or even bare root seedlings, can be very inexpensive, easy to plant, and may catch up with their larger container alternatives within a few years after planting in your yard.
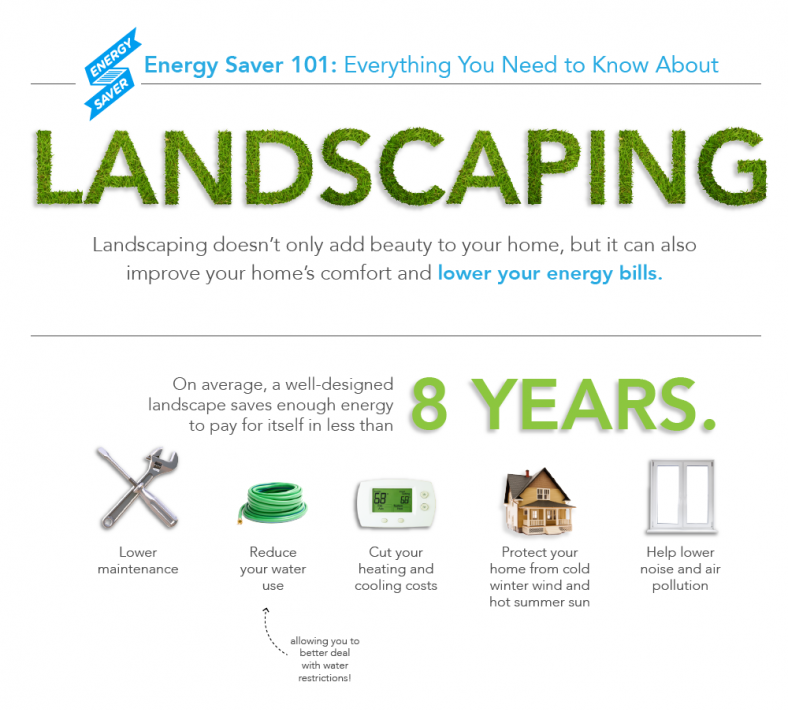
Figure 3. Energy Saver 101 Infographic: Landscaping. Credit: US DOE – EERE / Infographic by Sarah Gerrity.
Ask for Help: Let a Pro Guide Your Plan of Action
Not the Do-It-Yourself (DIY) type? No worries, the State of Florida has strong regulations and oversight of building related industries to protect consumers who need professional help. If home energy self-audits are too generic to address your specific needs, you may benefit from hiring a RESNET Home Energy Rating System (HERS) Rater to conduct a thorough home energy audit to test for air leakage within the building envelope and the duct system. HERS Raters are masters of the whole-house systems approach.
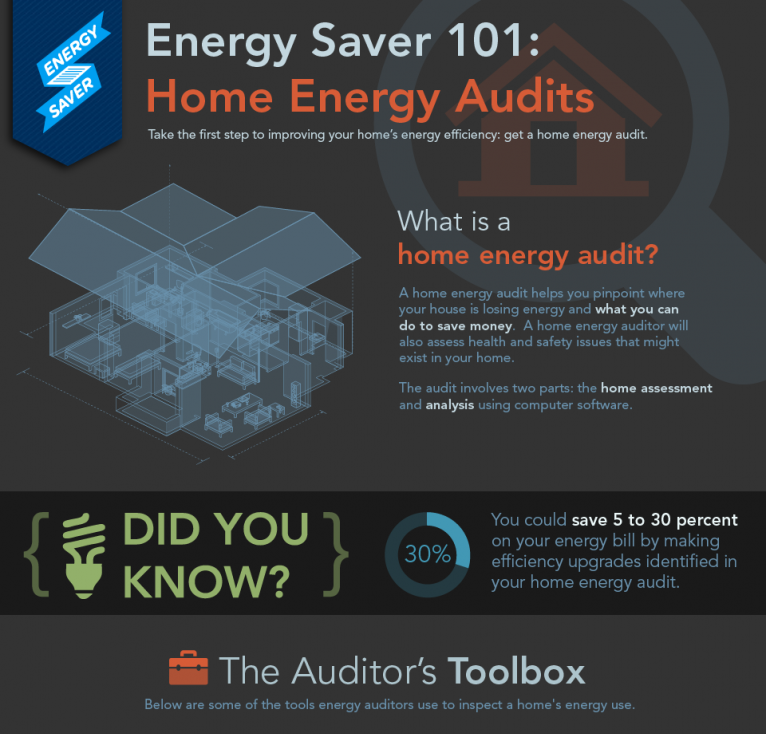
Figure 4. Energy Saver 101 Infographic: Home Energy Audits (Click on the Image to Open the Full Infographic). Credit: US DOE – EERE / Infographic by Sarah Gerrity.
Step 2. Tighten Air Barriers
Beyond the free and low cost steps of lifestyle and lighting improvements, the next best return on your investment comes from addressing the air and thermal barriers of the home (referred to as the building envelope). This building envelope includes the home’s foundation, walls, doors, windows, roof, and all the related pathways of potential air and temperature exchange such as through penetrations of wires, pipes, and vents.
Your home is constantly breathing or exchanging air with the surrounding outdoor environment. Unconditioned outdoor air comes in, while conditioned indoor air flows out. The larger the difference in both temperature and moisture content of the indoor versus the outdoor air, the more energy your heating, ventilating, and air conditioning (HVAC) system needs to use to keep you comfortable.
Seal Air Leakage
Generally the first place to start in creating an energy efficient living space is air sealing. This means to create a “tighter” home by sealing cracks and gaps around windows, doors, plumbing, electrical and venting penetrations so that you can control air exchange and ventilation. Sealing these leaks will mean that less unconditioned air makes it into your house and produces less load on your HVAC system. Start by using caulking and weather-stripping to seal air leaks. This is a low budget item that most homeowners can do. Figure 2 will help you determine where to look for leaks and the following references will give you more information on air sealing.
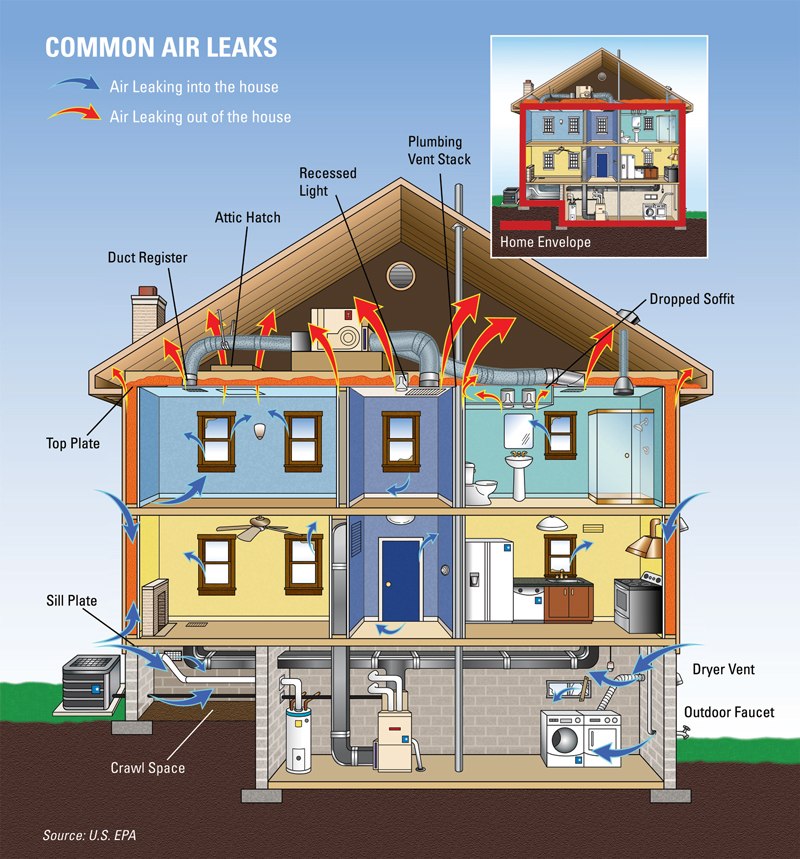
Figure 5. Common Air Leaks (Click on the Image to Open the Air Seal and Insulate with ENERGY STAR® Brochure). Credit: US EPA / ENERGY STAR®.
Step 3. Thicken Thermal Barriers
Like the sleeping bag you take on your next camping trip, the thermal barrier you create to hold the heat inside your home is a function of the insulating material and its thickness. For the weekend warriors who camp from the tailgate of their vehicle, a heavier, thicker sleeping bag with lower quality insulating material may suffice. For the master hikers who pack-in and pack-out on foot, high tech performance from lighter, thinner sleeping bags with radiant reflecting materials are required.
Every household will have different goals which may affect budgets and decisions on duct system improvements, attic insulation materials, and radiant barriers. However, all households would benefit from addressing duct system deficiencies first and insulation deficiencies second so as to reduce the risks of insulation being compressed by duct system technicians if the work order were reversed.
Seal and Insulate Duct Systems
Leaky duct systems can cause a major loss in energy efficiency as they dump conditioned air in undesirable places; like your attic or underneath your house. That means that you are paying to heat or cool the outdoors. In addition, when your cool air goes out, hot humid air comes in through air gaps to take its place. This puts additional strain on your HVAC and makes your duct system a prime target for an energy efficiency upgrade.
First, visually inspect your duct system for gaps or disconnected runs and try to install the ducts within conditioned space whenever possible in new construction and major home renovation (Figure 3). Second, use mechanical fasteners to secure ducts. Third, use mastic sealant to seal gaps. Finally, insulate ducts to prevent radiation losses.
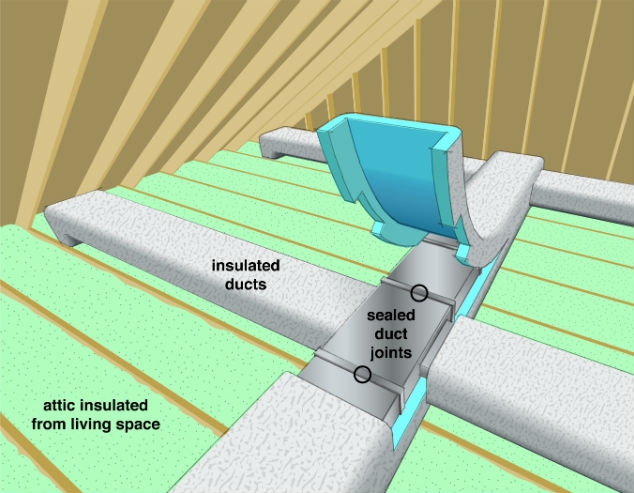
Figure 6. Tips for Sealing and Insulating Air Ducts (Click on the Image to Open the Full Tips Page). Credit: US DOE – EERE.
Optimize Insulation at the Ceiling-to-Attic Interface
Roof temperatures can reach over 140 degrees Fahrenheit, so target attic insulation first and aim for performance of R-30 to R-38 for Florida’s climate zones. Wall and floor insulation generally offer a lower return on their retrofit investment, especially in Florida’s hot-humid climate. Due to their high cost and lower impact, consider other efficiency measures before adding insulation to walls and floors. One exception may be homes with raised wood floors and crawlspaces. If your elevated wood floor feels cold or drafty during the winter consider adding insulation under the floor decking. Other floor types, such as slab on grade foundations, may actually reduce HVAC load in cooling dominated climates. The US Department of Energy also provides helpful information on insulation levels recommended for your area and building location.
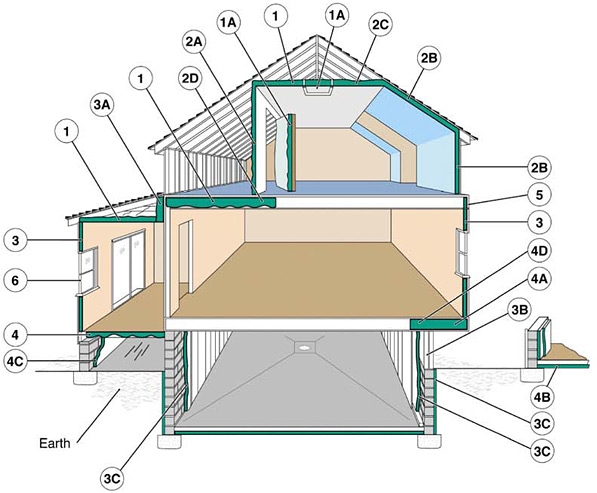
Figure 7. Examples of Where to Insulate at Home (Click on the Image to Open the Full Tips Page). Credit: US DOE – EERE.
Step 4. Consider Space Conditioning
After you’ve optimized your behavior and addressed your building envelope, it’s time to consider your home’s active space conditioning system. Most often referred to as a heating, ventilating, and air conditioning (HVAC) system, this major building component conditions the air within your indoor spaces. In 1993, HVAC systems accounted for approximately 57.7 percent of the energy use in a home as a national average. By 2009, this ratio had dropped to 47.7 percent as the proportion from appliances, electronics, and lighting end uses grew substantially (from 24.0 percent in 1993 to 34.6 percent in 2009). [9] Within Florida, on average residential HVAC systems consumed 37.9 percent (three quarters of which is for air conditioning) versus 42.4 percent for appliances, lighting, and electronics. [10] Efficiency of the building envelope and the HVAC system dictates both temperature and humidity within the home and is highly dependent on many other interdependent systems.
Routinely Maintain HVAC Systems
The best way to ensure that your home continues to perform at peak energy efficiency is to perform regular HVAC maintenance. This includes steps that you can take such as frequently replacing air filters, cleaning condenser coils, straightening coil fins, and cleaning condensate lines. The resources listed below can help you with these tasks. Other steps that should be taken by a qualified HVAC technician include checking refrigerant levels, testing for refrigerant leaks, checking the air flow and testing the electrical controls. This process is called commissioning and ensures that your HVAC is at peak performance so that your home is comfortable and efficient.
Replace End-of-Life HVAC Systems
If your HVAC system is too old or run down to benefit from regular maintenance, consider upgrading to a newer system with a higher rated seasonal energy efficiency ratio (SEER). However, with high-cost, slow-payback improvements such as an HVAC system, it is generally considered best practice to only replace old systems when they fail or when they are beyond their estimated useful lifespan. In other words, replacing an 8-year old HVAC system with a code-minimum SEER rating to squeeze some energy savings from a higher SEER rated system is unwise because the older system may only be halfway through its useful life. The original sunk costs to install the older system have not yet been sufficiently recovered to offset the additional costs for the new system, even after accounting for estimated monthly energy savings. Remember, major home energy system improvements are only wise when conducted at the right time with the right sized replacements!
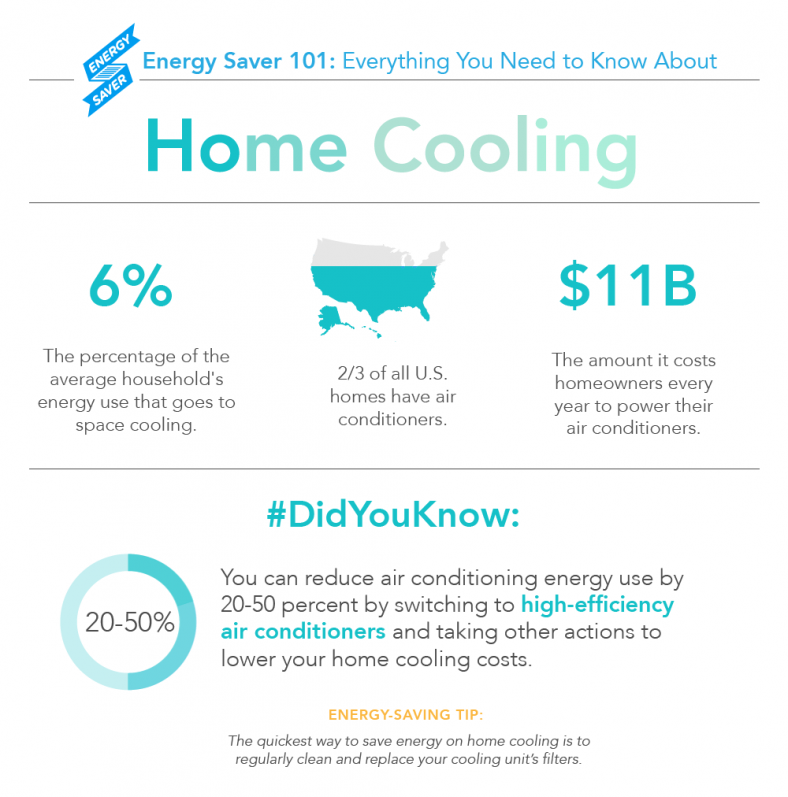
Figure 8. Energy Saver 101 Infographic: Home Cooling (Click on the Image to Open the Full Infographic). Credit: US DOE – EERE / Infographic by Sarah Gerrity.
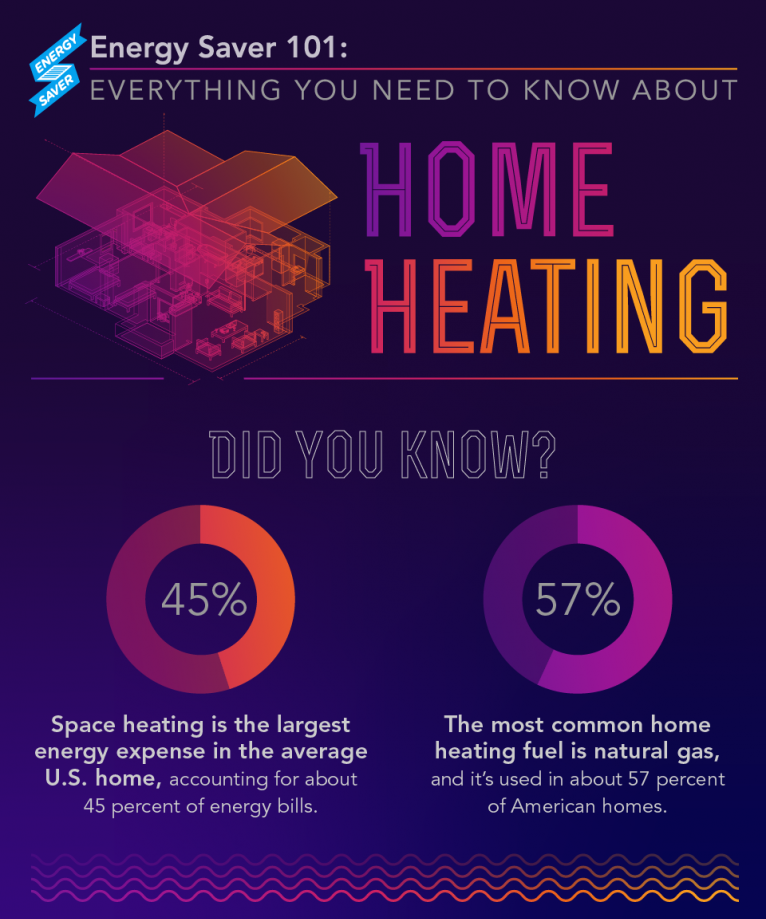
Figure 9. Energy Saver 101 Infographic: Home Heating (Click on the Image to Open the Full Infographic). Credit: US DOE – EERE / Infographic by Sarah Gerrity.
Properly Size HVAC Systems: Windows and Thermal Load
When it comes to right sizing your HVAC equipment, it’s important to fully understand the current and future conditions of your building envelope. Rules of thumb (e.g., one ton of HVAC capacity for every 500 square feet of conditioned space) are not sufficient to make sound, long term home performance decisions. The quality of air and thermal barriers affect system sizing and its ability to heat, cool, and dehumidify a home.
Many geographic regions of the United States consider high performance windows to be a meaningful home energy efficiency improvement. However, within hot-humid climates dominated by mechanical cooling for most of the year, the energy losses from older, lower performance windows are often much less than those for homes in northern climates dominated by mechanical heating. One reason for this is that the temperature differential between the indoor and outdoor air is often smaller in Florida’s extreme HVAC seasons (e.g., 78 degrees Fahrenheit indoors vs. 98 degrees Fahrenheit outdoors for a 20 degrees Fahrenheit differential during the summer peak) versus the extreme HVAC seasons in northern climates (e.g., 65 degrees Fahrenheit indoors vs. 25 degrees Fahrenheit outdoors for a 40 degrees Fahrenheit differential during the winter peak).
Within Florida, the most important consideration for improving the efficiency of windows is air sealing (as previously mentioned). Once windows are properly sealed using caulking and weather-stripping, shading is the next step. First consider adding exterior shading on the east, west and south sides using properly placed trees, awnings, tinted window film, or solar screens. Exterior shading has the most benefit as it blocks solar radiation from entering the home while still allowing light to enter. Next consider using blinds or drapes to shade the home from the inside. Interior shading options stop solar radiation near the window, limiting heat gain in the home but also reducing day lighting. If your windows are unable to be properly sealed, or if you are considering replacing windows for functionality or aesthetic reasons, consider using energy efficient windows.
Windows are a big ticket item in home renovation but can significantly improve comfort and energy performance. Replacing old windows with double pane, low-e windows can be a major benefit. However, remember that proper, air-tight installation is as important as the window itself. If you are going to replace windows, it should be done before HVAC replacement as window efficiency plays a large part in heating and cooling load calculations that determine the size of your HVAC equipment. Better windows could mean that you will need a smaller HVAC system. That said, most Florida homes can perform well with older windows so long as they are caulked, weatherstripped, and sufficiently shaded. Window replacement is often best left as an aesthetic and/or functional decision rather than an energy saving decision due to their low energy payback rate.
Step 5. Heat Water More Efficiently
On average, residential water heating consumed 14.5 percent of total household energy end use in Florida versus 17.7 percent on average nationally. [11] A couple of reasons why water heating in Florida requires less energy than the national average is that our warmer ground water temperature requires less energy to bring the water to indoor use comfort levels and our warmer weather results in slower heat losses from standing water tanks. Despite these geographic benefits, most Floridians with older water heating technologies can save energy and money by selecting an efficient ENERGY STAR® certified model when it comes time for a replacement.
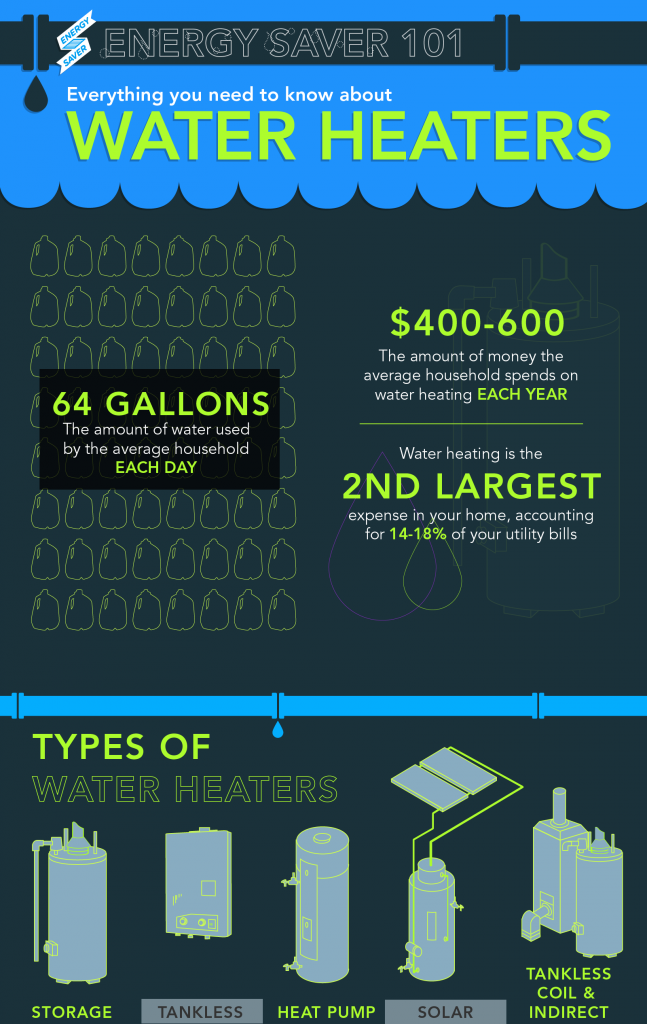
Figure 10. Energy Saver 101 Infographic: Water Heaters (Click on the Image to Open the Full Infographic). Credit: US DOE – EERE / Infographic by Sarah Gerrity.
Step 6. Replace Major Appliances and Fixtures
Appliances should be replaced as needed with more energy efficient options or models. Though these are smaller contributors in a systems upgrade approach, they can produce dual benefits. First, they offer reduced direct energy consumption with each use and in standby mode. In addition, they may produce less heat therefore reducing cooling load on your HVAC system. This applies to most appliances such as refrigerators, dishwashers and clothes washers and dryers. Always look for the ENERGY STAR® logo and EnergyGuide label to ensure you’re getting the best performance for your appliances.
Figure 11. Energy Saver: Shopping for Appliances (Click on the Image to Open the Full Tips Page). Credit: US DOE – EERE.
Overview
Though every situation is unique, the best general approach includes the following steps in roughly the order described in (Table 1).
Table 1. The Whole-House Systems Checklist
| Step | System Component | Strategy | Impact |
| 1a | Audit and Act | Be mindful and learn how you can help yourself or know when and why to ask for professional help | Every successful outcome starts with an achievable plan of action…know yours |
| 1b | Standby Power / Phantom Loads | Be a smart human and unplug unused devices…or let a smart power strip do it for you | Reduces electricity use by consumer electronics, appliances, and related plug loads when sitting idle in standby mode |
| 1c | Lighting | Replace high wattage bulbs (such as incandescent and halogen) with low wattage alternatives of comparable lumen value (such as compact fluorescent lamps and LEDs) | Reduces lighting energy consumption and unnecessary heat load to indoor spaces |
| 1d | Ceiling fans | Install ENERGY STAR® ceiling fans in commonly occupied rooms | Reduces load on HVAC system by improving occupant comfort |
| 1e | Landscape Efficiently | Plant for the seasons (summer shade, winter sun, and fall/spring breezes) | Reduces thermal heat gain along the building envelope and enables passive ventilation |
| 2 | Weatherization | Weatherize and seal any holes or gaps in building envelope (doors, windows, walls, floor, and ceiling) | Improves air barrier by reducing air leakage |
| 3a | Duct Systems | Seal and insulate ducts | Improves air barrier by reducing air leakage |
| 3b | Attic Insulation | Improve / replace to R-value recommended for your area | Improves thermal barrier by increasing insulation function |
| 4a | HVAC system | Service existing HVAC system and/or upgrade to properly sized SEER 14 or higher HVAC system | Improves heating and cooling efficiency |
| 4b | Windows | If windows are broken, unsafe, aesthetically displeasing, or you plan to account for their performance during a new HVAC system upgrade, consider replacing single-pane metal framed windows with double-paned low-E fiberglass, vinyl, or wood framed alternatives | Improves air and thermal barriers by reducing air leakage and reducing solar heat gain |
| 5 | Water heaters | Replace end-of-life, inefficient models with modern ENERGY STAR® alternatives | Reduces water heater energy consumption |
| 6 | Appliances | Replace end-of-life, inefficient models with modern ENERGY STAR® alternatives | Reduces appliance energy consumption |

Figure 12. Energy Saver 101 Infographic: Saving Energy Saves Money (Click on the Image to Open the Full Infographic and Tips Page). Credit: US DOE – EERE / Infographic by Sarah Gerrity.
Incentives
Many utility companies offer free or low-cost audits, as well as incentive and rebate programs for many of the above recommended steps. In addition, you may be eligible for state or federal tax credits when you purchase certain energy efficient components. See the My Florida Home Energy (MFHE) – Incentives page for additional information.
References and Resources
Step 1a. Audit Resources
- My Florida Home Energy (MFHE). Home Inspections.
- My Florida Home Energy (MFHE). Interactive Tour and Self Audit.
- My Florida Home Energy (MFHE). Selecting Contractors.
- My Florida Home Energy (MFHE). Testing for Air Leakage.
- Residential Energy Services Network (RESNET).
- US Department of Energy (DOE) – Office of Energy Efficiency and Renewable Energy (EERE). Energy Saver – Home Energy Audits.
- US Department of Energy (DOE) – Office of Energy Efficiency and Renewable Energy (EERE). Energy Saver – Six Places to Find Help with Your Energy Costs.
Step 1b. Standby Power Resources
- My Florida Home Energy (MFHE). Home Energy Basics.
- US Department of Energy (DOE) – Lawrence Berkeley National Laboratory (LBNL). Standby Power.
- US Department of Energy (DOE) – Office of Energy Efficiency and Renewable Energy (EERE). Energy Saver – Vampire Power Is Scary All Year Round.
- US Department of Energy (DOE) – Office of Energy Efficiency and Renewable Energy (EERE). Low Standby Power Products.
- US Environmental Protection Agency (EPA) – ENERGY STAR®. Standby Power.
Step 1c. Landscaping Resources
- My Florida Home Energy (MFHE). Energy Efficient Landscaping.
- My Florida Home Energy (MFHE). Water Conserving Irrigation.
- My Florida Home Energy (MFHE). Water Wise Floridians.
- US Department of Energy (DOE) – Office of Energy Efficiency and Renewable Energy (EERE). Energy Saver – Landscaping.
Step 1d. Lighting and Fan Resources
- My Florida Home Energy (MFHE). Ceiling Fans.
- My Florida Home Energy (MFHE). Compact Fluorescent Lamps (CFLs).
- My Florida Home Energy (MFHE). Light Emitting Diodes (LEDs).
- My Florida Home Energy (MFHE). Lighting: Basics.
- US Department of Energy (DOE) – Office of Energy Efficiency and Renewable Energy (EERE). Energy Saver – Lighting.
- US Environmental Protection Agency (EPA) – ENERGY STAR®. Lighting.
- US Environmental Protection Agency (EPA) – ENERGY STAR®. Ceiling Fans.
Step 2. Air Sealing Resources
- Iowa Energy Center. Home Series Energy Guide (Look for the “Home Tightening, Insulation and Ventilation” Section).
- My Florida Home Energy (MFHE). Caulking and Weatherstripping.
- My Florida Home Energy (MFHE). Weatherization Best Practices.
- US Department of Energy (DOE) – National Renewable Energy Laboratory (NREL). (April 2001). Weatherize Your Home: Caulk and Weather Strip. Document No. DOE/GO-102001-1172/FS203.
- US Department of Energy (DOE) – Office of Energy Efficiency and Renewable Energy (EERE). Energy Saver – Sealing Your Home.
- US Environmental Protection Agency (EPA) – ENERGY STAR®. Seal and Insulate with ENERGY STAR®.
Step 3a. Duct System Resources
- My Florida Home Energy (MFHE). Duct Systems.
- US Department of Energy (DOE) – Office of Energy Efficiency and Renewable Energy (EERE). Energy Saver – Tips: Air Ducts.
- US Department of Energy (DOE) – Office of Energy Efficiency and Renewable Energy (EERE). Energy Saver – Minimizing Energy Losses in Ducts.
- US Environmental Protection Agency (EPA) – ENERGY STAR®. Duct Sealing.
Step 3b. Insulation Resources
- My Florida Home Energy (MFHE). Insulation.
- My Florida Home Energy (MFHE). Radiant Barriers.
- US Department of Energy (DOE) – Oak Ridge National Laboratory (ORNL). Insulation Calculator for Your Home.
- US Department of Energy (DOE) – Office of Energy Efficiency and Renewable Energy (EERE). Energy Saver – Insulation.
- US Environmental Protection Agency (EPA) – ENERGY STAR®. Seal and Insulate with ENERGY STAR®.
Step 4a. HVAC Resources
- Home Innovation Research Labs – ToolBase Services. Whole-House Mechanical Ventilation Strategies.
- My Florida Home Energy (MFHE). Air Conditioning.
- My Florida Home Energy (MFHE). Indoor Air Quality and Energy.
- My Florida Home Energy (MFHE). Ventilation.
- US Department of Energy (DOE) – Office of Energy Efficiency and Renewable Energy (EERE). Energy Saver – Heating and Cooling.
- US Department of Energy (DOE) – Office of Energy Efficiency and Renewable Energy (EERE). Energy Saver – Ventilation.
- US Environmental Protection Agency (EPA) – ENERGY STAR®. Heat and Cool Efficiently.
Step 4b. Window Resources
- Efficient Windows Collaborative. Your Gateway to Information on How to Choose Energy Efficient Residential Windows.
- Hammer, Marie. (2003). Window Management for Energy Conservation. University of Florida IFAS Extension.
- My Florida Home Energy (MFHE). Windows and Skylights.
- National Fenestration Rating Council (NFRC). Fact Sheets for Consumers.
- US Department of Energy (DOE). Office of Energy Efficiency and Renewable Energy (EERE). Energy Saver – Windows, Doors, and Skylights.
- US Environmental Protection Agency (EPA) – ENERGY STAR®. Residential Windows, Doors, and Skylights.
- US Environmental Protection Agency (EPA) – ENERGY STAR®. What Makes it ENERGY STAR®?
- US Federal Trade Commission (FTC) – Consumer Information. Shopping for New Windows?
Step 5. Water Heater Resources
- My Florida Home Energy (MFHE). Water Heating: Basics.
- My Florida Home Energy (MFHE). Water Heating: Tankless.
- US Department of Energy (DOE) – Office of Energy Efficiency and Renewable Energy (EERE). Energy Saver – Water Heating.
- US Environmental Protection Agency (EPA) – ENERGY STAR®. Water Heaters.
Step 6. Appliance Resources
- My Florida Home Energy (MFHE). Clothes Washers and Dryers.
- My Florida Home Energy (MFHE). Dishwashers.
- My Florida Home Energy (MFHE). Energy Efficient Appliances.
- My Florida Home Energy (MFHE). Refrigerators and Freezers.
- US Department of Energy (DOE). Office of Energy Efficiency and Renewable Energy (EERE). Energy Saver: Appliances and Electronics.
- US Environmental Protection Agency (EPA) – ENERGY STAR®. All Certified Products.
Overview Whole-House Resources
- Amann, J., Wilson, A., and Ackerly, K. 2007. Consumer Guide to Home Energy Savings Online. American Council for an Energy-Efficient Economy. Washington, DC.
- Southface Energy Institute. Energy Checklist: Energy Efficient Construction. Energy Technical Bulletin No. 18. pp. 4.
- US Department of Energy (DOE) – Office of Energy Efficiency and Renewable Energy (EERE). (March 1999). Energy Efficiency Pays: System Approach Cuts Home Energy Waste and Saves Money. Technology Fact Sheet DOE/GO-10099-746.
- US Department of Energy (DOE) – Office of Energy Efficiency and Renewable Energy (EERE). Energy Saver Guide.
- US Department of Energy (DOE) – Office of Energy Efficiency and Renewable Energy (EERE). Energy Saver – Homes.
- US Department of Energy (DOE) – Office of Energy Efficiency and Renewable Energy (EERE). Energy Saver – Home Design and Remodeling.
- US Department of Energy (DOE) – Office of Energy Efficiency and Renewable Energy (EERE). (2003). Whole-House Energy Checklist: 50 Steps to Energy Efficiency in the Home. Technology Fact Sheet DOE/GO-10099-766.
- US Department of Energy (DOE) – Office of Energy Efficiency and Renewable Energy (EERE). (2009). Energy Saver: Whole-House Systems Approach.
Acknowledgements
Authors: Hal S. Knowles, IIIa and Nicholas Taylora
Reviewers: Randy Cantrellb (2015), Craig Millera (2015) and Wendell Porterc (2015)
a Program for Resource Efficient Communities, Florida Cooperative Extension Service, Institute of Food and Agricultural Sciences, University of Florida, Gainesville, FL
b Department of Family, Youth, and Community Sciences, Florida Cooperative Extension Service, Institute of Food and Agricultural Sciences, University of Florida, Gainesville, FL
c Department of Agricultural and Biological Engineering, University of Florida, Gainesville, FL
First published May 2009. Revised June 2015.
A special thank-you to the U.S. Department of Energy (DOE), Building Technologies Program through the Oak Ridge National Laboratory, for supporting the original development of this publication.
This is a fact sheet for the Florida Energy Systems Consortium (FESC). The goal of the consortium is to become a world leader in energy research, education, technology, and energy systems analysis.
Footnotes
[1] Pfleger, W., C. Perry, N. Hurst, and J. Tiller. (2011). Market Impacts of ENERGY STAR® Qualification for New Homes. US Department of Energy Award No. DE-EE-0000157. pp. 53. Retrieved June 28, 2015.
[2] Bloom, B., M.C. Nobe, and M.D. Nobe. (2011). Valuing Green Home Designs: A Study of ENERGY STAR® Homes. The Journal of Sustainable Real Estate. Vol. 3, No. 1. pp. 109-126. Retrieved June 28, 2015.
[3] Stukel, L., R. Scheu, C. Gamba, and P. Brookstein. (2014). Valuing Home Performance Improvements in Real Estate Markets. Proceedings of the 2014 ACEEE Summer Study on Energy Efficiency in Buildings. pp. 10-302 to 10-315. Retrieved June 28, 2015.
[4] McMahon, J.E., McNeil, M.A., & Ramos, I.S. (November 2007). Chapter 9: Buildings. In A.W. King, L.Dilling, G.P. Zimmerman, D.M. Fairman, R.A. Houghton, G. Marland, A.Z. Rose & T.J. Wilbanks (Eds.), The First State of the Carbon Cycle Report (SOCCR): The North American Carbon Budget and Implications for the Global Carbon Cycle (pp. 95-102). US Climate Change Science Program: Synthesis and Assessment Product 2.2. Asheville, NC, USA: National Oceanic and Atmospheric Administration, National Climatic Data Center. Retrieved June 28, 2015.
[5] US Department of Energy (DOE). (July 2014). The Water-Energy Nexus: Challenges and Opportunities. Retrieved June 28, 2015.
[6] National Conference of State Legislatures. (February 19, 2014). Overview of the Water-Energy Nexus in the United States. Retrieved June 28, 2015.
[7] International Energy Agency (IEA). Water for Energy. Retrieved June 28, 2015.
[8] US Government Accountability Office (GAO). Key Issues: Energy-Water Nexus. Retrieved June 28, 2015.
[9] US Energy Information Administration (EIA). (March 7, 2013). Heating and Cooling No Longer Majority of US Home Energy Use. Retrieved June 29, 2015.
[10] US Energy Information Administration (EIA). 2009 Residential Energy Consumption Survey (RECS) Data. Table CE3.4. End-Use Consumption Totals and Averages, South Homes. Retrieved June 29, 2015.
[11] US Energy Information Administration (EIA). 2009 Residential Energy Consumption Survey (RECS) Data. Table CE3.4. End-Use Consumption Totals and Averages, South Homes. Retrieved June 29, 2015.